This the multi-page printable view of this section. Click here to print.
Configuration
- 1: Authentication
- 1.1: Header strategy
- 1.2: Anonymous strategy
- 1.3: OpenID Connect strategy
- 1.4: OpenShift strategy
- 1.5: Token strategy
- 2: Namespace Management
- 3: Role-based access control
- 4: Virtual Machine workloads
- 5: Custom Dashboards
- 6: Jaeger / Distributed Tracing
1 - Authentication
Kiali supports five authentication mechanisms:
- anonymous: gives free access to Kiali.
- header: requires Kiali to run behind a reverse proxy that is responsible for injecting the user’s token or a token with impersonation.
- openid: requires authentication through a third-party service to access Kiali.
- openshift: requires authentication through the OpenShift authentication to access Kiali.
- token: requires user to provide a Kubernetes ServiceAccount token to access Kiali.
The default authentication mechanism for OpenShift clusters is openshift. For
all other Kubernetes clusters, the default mechanism is token.
Read the dedicated page of each authentication mechanism (by clicking on the
bullets) to learn more. All mechanisms other than anonymous support Role-based access control.
1.1 - Header strategy
Introduction
The header strategy assumes a reverse proxy is in front of Kiali, such as
OpenUnison or OAuth2 Proxy, injecting the user’s identity into each request to
Kiali as an Authorization header. This token can be an OpenID Connect
token or any other token the cluster recognizes. All requests to Kubernetes
will be made with this token, allowing Kiali to use the user’s own RBAC
context.
In addition to a user token, the header strategy supports impersonation
headers. If the impersonation headers are present in the request, then Kiali
will act on behalf of the user specified by the impersonation (assuming the
token supplied in the Authorization header is authorized to do so).
The header strategy takes advantage of the cluster’s RBAC. See the
Role-based access control documentation for more details.
Set-up
The header strategy will work with any Kubernetes cluster. The token provided
must be supported by that cluster. For instance, most “on-prem” clusters support
OpenID Connect, but cloud hosted clusters do not. For clusters that don’t support
a token, the impersonation
headers can be injected by the reverse proxy.
spec:
  auth:
    strategy: header
The header strategy doesn’t have any additional configuration.
HTTP Header
The header strategy looks for a token in the Authorization HTTP header with the
Bearer prefix. The HTTP header should look like:
Authorization: Bearer TOKEN
Where TOKEN is the appropriate token for your cluster. This TOKEN will be
submitted to the API server via a TokenReview to validate the token ONLY
on the first access to Kiali. On subsequent calls the TOKEN is passed through
directly to the API server.
Security Considerations
Network Policies
A policy should be put in place to make sure that the only “client” for Kiali is the authenticating reverse proxy. This helps limit potential abuse and ensures that the authenticating reverse proxy is the source of truth for who accessed Kiali.
Short Lived Tokens
The authenticating reverse proxy should inject a short lived token in the
Authorization header. A shorter lived token is less likely to be abused if
leaked. Kiali will take whatever token is passed into the reqeuest, so as tokens
are regenerated Kiali will use the new token.
Impersonation
TokenRequest API
The authenticating reverse proxy should use the TokenRequest API instead of static
ServiceAccount tokens when possible while using impersonation. The
ServiceAccount that can impersonate users and groups is privileged and having it
be short lived cuts down on the possibility of a token being leaked while it’s being
passed between different parts of the infrastructure.
Drop Incoming Impersonation Headers
The authenticating proxy MUST drop any headers it receives from a remote client that match the impersonation headers. Not only do you want to make sure that the authenticating proxy can’t be overriden on which user to authenticate, but also what groups they’re a member of.
1.2 - Anonymous strategy
Introduction
The anonymous strategy removes any authentication requirement. Users will
have access to Kiali without providing any credentials.
Although the anonymous strategy doesn’t provide any access protection, it’s
valid for some use-cases. Some examples known from the community:
- Exposing Kiali through a reverse proxy, where the reverse proxy is providing a custom authentication mechanism.
- Exposing Kiali on an already limited network of trusted users.
- When Kiali is accessed through
kubectl port-forwardor alike commands that allow usage of the cluster’s RBAC capabilities to limit access. - When developing Kiali, where a developer has a private instance on his own machine.
anonymous
strategy will leave Kiali unsecured. If you are using this option, make sure
that Kiali is available only to trusted users, or access is protected by other
means.
Set-up
To use the anonymous strategy, use the following configuration in the Kiali CR:
spec:
  auth:
    strategy: anonymous
The anonymous strategy doesn’t have any additional configuration.
Access control
When using the anonymous strategy, the content displayed in Kiali is based on
the permissions of the Kiali service account. By default, the Kiali service
account has cluster wide access and will be able to display everything in the
cluster.
OpenShift
If you are running Kiali in OpenShift, access can be customized by changing privileges to the Kiali ServiceAccount. For example, to reduce permissions to individual namespaces, first, remove the cluster-wide permissions granted by default:
oc delete clusterrolebindings kiali
Then grant the kiali role only in needed namespaces. For example:
oc adm policy add-role-to-user kiali system:serviceaccount:istio-system:kiali-service-account -n ${NAMESPACE}
View only
You can tell the Kiali Operator to install Kiali in “view only”
mode (this does work for either OpenShift or Kubernetes). You do this by
setting the view_only_mode to true in the Kiali CR, which
allows Kiali to read service mesh resources found in the cluster, but it does
not allow any change:
spec:
  deployment:
    view_only_mode: true
1.3 - OpenID Connect strategy
Introduction
The openid authentication strategy lets you integrate Kiali to an external
identity provider that implements OpenID Connect, and allows
users to login to Kiali using their existing accounts of a
third-party system.
If your
Kubernetes cluster is also integrated with your OpenId provider,
then Kiali’s openid strategy can offer role-based access control (RBAC) through the
Kubernetes authorization mechanisms. See the
RBAC documentation for more details.
Currently, Kiali supports the authorization code flow (preferred) and the implicit flow of the OpenId Connect spec.
Requirements
If you want to enable usage of the OpenId’s authorization code flow, make sure that the Kiali’s signing key is 16, 24 or 32 byte long. If you setup a signing key of a different size, Kiali will only be capable of using the implicit flow. If you install Kiali via the operator and don’t set a custom signing key, the operator should create a 16 byte long signing key.
If you don’t need RBAC support, the only requirement is to have a working OpenId Server where Kiali can be configured as a client application.
If you do need RBAC support, you need either:
- A Kubernetes cluster configured with OpenID connect integration, which results in the API server accepting tokens issued by your identity provider.
- A replacement or reverse proxy for the Kubernetes cluster API capable of handling the OIDC authentication.
The first option is preferred if you can manipulate your cluster API server startup flags, which will result in your cluster to also be integrated with the external OpenID provider.
The second option is provided for cases where you are using a managed
Kubernetes and your cloud provider does not support configuring OpenID
integration. Kiali assumes an implementation of a Kubernetes API server. For
example, a community user has reported to successfully configure Kiali’s OpenID
strategy by using
kube-oidc-proxy which is a
reverse proxy that handles the OpenID authentication and forwards the
authenticated requests to the Kubernetes API.
Azure
Several Azure users have reported that OpenId authentication is not working correctly even after enabling Azure AD integration in AKS clusters. As of now, if you need RBAC, you will need to fallback to usingkube-oidc-proxy or a
similar alternative. If you don’t need RBAC, just configure Kiali accordingly.
As nobody in the Kiali team has access to Azure, contributions for improved
Azure support will be appreciated.
Set-up with RBAC support
Assuming you already have a working Kubernetes cluster with OpenId integration
(or a working alternative like kube-oidc-proxy), you should already had
configured an application or a client in your OpenId server (some cloud
providers configure this app/client automatically for you). You must re-use
this existing application/client by adding the root path of your Kiali
instance as an allowed/authorized callback URL. If the OpenID server provided
you a client secret for the application/client, or if you had manually set a
client secret, issue the following command to create a Kubernetes secret
holding the OpenId client secret:
kubectl create secret generic kiali --from-literal="oidc-secret=$CLIENT_SECRET" -n $NAMESPACE
where $NAMESPACE is the namespace where you installed Kiali and
$CLIENT_SECRET is the secret you configured or provided by your OpenId
Server. If Kiali is already running, you may need to restart the Kiali pod so
that the secret is mounted in Kiali.
Then, to enable the OpenID Connect strategy, the minimal configuration you need to set in the Kiali CR is like the following:
spec:
  auth:
    strategy: openid
    openid:
      client_id: "kiali-client"
      issuer_uri: "https://openid.issuer.com"
This assumes that your Kubernetes cluster is configured with OpenID Connect
integration. In this case, the client-id and issuer_uri attributes must
match the --oidc-client-id and --oidc-issuer-url flags
used to start the cluster API server.
If these values don’t match, users will fail to login to Kiali.
If you are using a replacement or a reverse proxy for the Kubernetes API server, the minimal configuration is like the following:
spec:
  auth:
    strategy: openid
    openid:
      api_proxy: "https://proxy.domain.com:port"
      api_proxy_ca_data: "..."
      client_id: "kiali-client"
      issuer_uri: "https://openid.issuer.com"
The value of client-id and issuer_uri must match the values of the
configuration of your reverse proxy or cluster API replacement. The api_proxy
attribute is the URI of the reverse proxy or cluster API replacement (only
HTTPS is allowed). The api_proxy_ca_data is the public certificate authority
file encoded in a base64 string, to trust the secure connection.
Set-up with no RBAC support
Register Kiali as a client application in your OpenId Server. Use the root path of your Kiali instance as the callback URL. If the OpenId Server provides you a client secret, or if you manually set a client secret, issue the following command to create a Kubernetes secret holding the OpenId client secret:
kubectl create secret generic kiali --from-literal="oidc-secret=$CLIENT_SECRET" -n $NAMESPACE
where $NAMESPACE is the namespace where you installed Kiali and
$CLIENT_SECRET is the secret you configured or provided by your OpenId
Server. If Kiali is already running, you may need to restart the Kiali pod so
that the secret is mounted in Kiali.
Then, to enable the OpenID Connect strategy, the minimal configuration you need to set in the Kiali CR is like the following:
spec:
  auth:
    strategy: openid
    openid:
      client_id: "kiali-client"
      disable_rbac: true
      issuer_uri: "https://openid.issuer.com"
Additional configurations
Configuring the displayed user name
The Kiali front-end will, by default, retrieve the string of the sub claim of
the OpenID token and display it as the user name. You can customize which field
to display as the user name by setting the username_claim attribute of the
Kiali CR. For example:
spec:
  auth:
    openid:
      username_claim: "email"
If you enabled RBAC, you will want the username_claim attribute to match the
--oidc-username-claim flag used to start the Kubernetes API server, or the
equivalent option if you are using a replacement or reverse proxy of the API
server. Else, any user-friendly claim will be OK as it is purely informational.
Configuring requested scopes
By default, Kiali will request access to the openid, profile and email
standard scopes. If you need a different set of scopes, you can set the
scopes attribute in the Kiali CR. For example:
spec:
  auth:
    openid:
      scopes:
      - "openid"
      - "email"
      - "groups"
The openid scope is forced. If you don’t add it to the list of scopes to
request, Kiali will still request it from the identity provider.
Configuring authentication timeout
When the user is redirected to the external authentication system, by default
Kiali will wait at most 5 minutes for the user to authenticate. After that time
has elapsed, Kiali will reject authentication. You can adjust this timeout by
setting the authentication_timeout with the number of seconds that Kiali
should wait at most. For example:
spec:
  auth:
    openid:
      authentication_timeout: 60 # Wait only one minute.
Using an OpenID provider with a self-signed certificate
If your OpenID provider is using a self-signed certificate, you can disable
certificate validation by setting the insecure_skip_verify_tls to true in
the Kiali CR:
spec:
  auth:
    openid:
      insecure_skip_verify_tls: true
However, if your organization or internal network has an internal trusted
certificate authority (CA), and your OpenID server is using a certificate
issued by this CA, you can configure Kiali to trust certificates from this CA,
rather than disabling verification. For this, create a ConfigMap named
kiali-cabundle containing the root CA certificate (the public component)
under the openid-server-ca.crt key:
apiVersion: v1
kind: ConfigMap
metadata:
  name: kiali-cabundle
  namespace: istio-system # This is Kiali's install namespace
data:
  openid-server-ca.crt: <the public component of your CA root certificate encoded in base64>
After restarting the Kiali pod, Kiali will trust this root certificate for all HTTPS requests related to OpenID authentication.
Using an HTTP/HTTPS Proxy
In some network configurations, there is the need to use proxies to connect to
the outside world. OpenID requires outside world connections to get metadata and
do key validation, so you can configure it by setting the http_proxy and
https_proxy keys in the Kiali CR. They use the same format as the HTTP_PROXY
and HTTPS_PROXY environment variables.
spec:
  auth:
    openid:
      http_proxy: http://USERNAME:PASSWORD@10.0.1.1:8080/
      https_proxy: https://USERNAME:PASSWORD@10.0.0.1:8080/
Passing additional options to the identity provider
When users click on the Login button on Kiali, a redirection occurs to the
authentication page of the external identity provider. Kiali sends a fixed set
of parameters to the identity provider to enable authentication. If you need to
add an additional set of parameters to your identity provider, you can use the
additional_request_params setting of the Kiali CR, which accepts key-value
pairs. For example:
spec:
  auth:
    openid:
      additional_request_params:
        prompt: login
The prompt parameter is a
standard OpenID parameter.
When the login value is passed in this parameter, the
identity provider is instructed to ask for user credentials regardless if the
user already has an active session because of a previous login in some other
system.
If your OpenId provider supports other non-standard parameters, you can specify
the ones you need in this additional_request_params setting.
Take into account that you should not add the client_id, response_type,
redirect_uri, scope, nonce nor state parameters to this list. These are
already in use by Kiali and some already have a dedicated setting.
Provider-specific instructions
Using with Keycloak
When using OpenId with Keycloak, you will need to enable the Standard Flow Enabled
option on the Client (in the Administration Console):
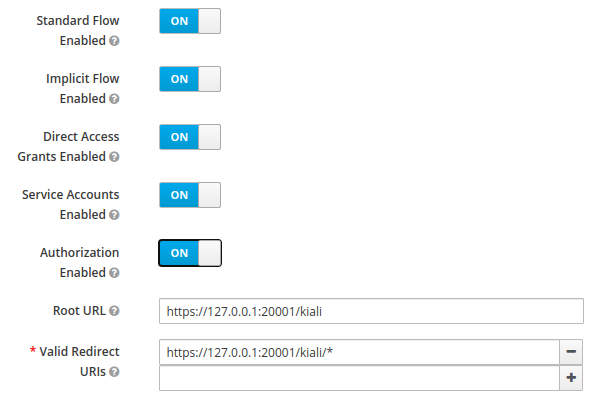
The Standard Flow described on the options is the same as the authorization code flow from the rest of the documentation.
If you get an error like Client is not allowed to initiate browser login with given response_type. Implicit flow is disabled for the client., it means that
your signing key for Kiali is not a standard size (16, 24 or 32 bytes long).
Enabling the Implicit Flow Enabled option of the client will make the problem
go away, but be aware that the implicit flow is less secure, and not
recommended.
Using with Google Cloud Platform / GKE OAuth2
If you are using Google Cloud Platform (GCP) and its products such as Google Kubernetes Engine (GKE), it should be straightforward to configure Kiali’s OpenID strategy to authenticate using your Google credentials.
First, you’ll need to go to your GCP Project and to the Credentials screen which
is available at (Menu Icon) > APIs & Services > Credentials.
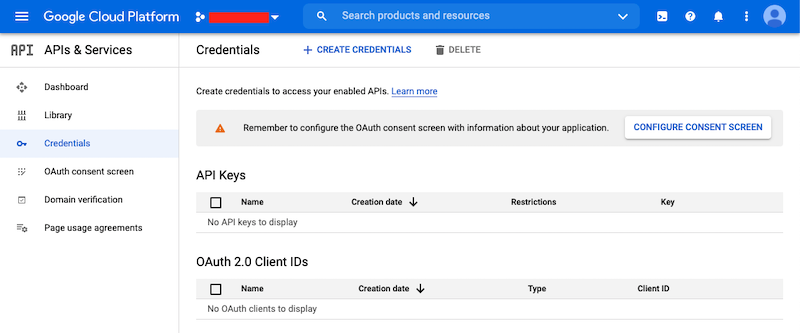
On the Credentials screen you can select to create a new OAuth client ID.
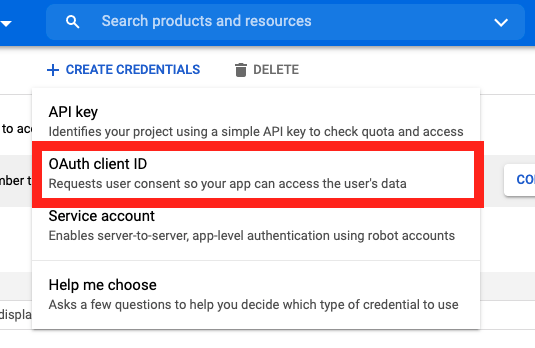
On the Create OAuth client ID screen, set the Application type to Web Application
and enter a name for your key.

Then enter in the Authorized Javascript origins and Authorized redirect URIs for your project.
You can enter in localhost as appropriate during testing. You can also enter multiple URIs as appropriate.
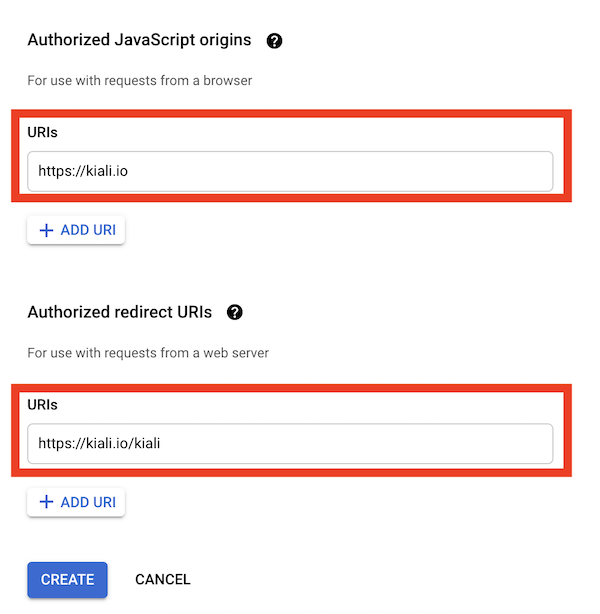
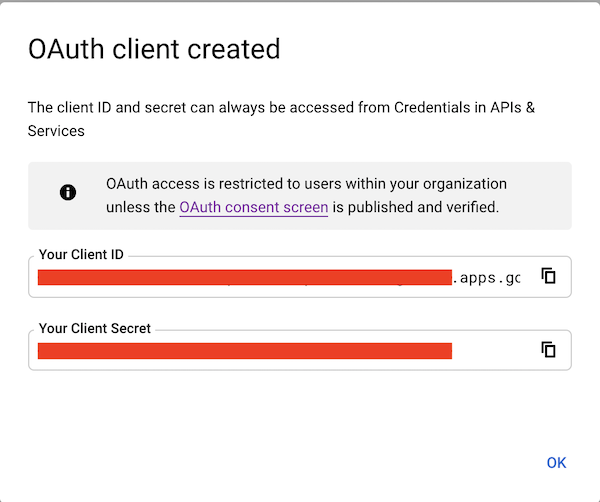
After clicking Create you’ll be shown your newly minted client id and secret. These are important and needed for your Kiali CR yaml and Kiali secrets files.
You’ll need to update your Kiali CR file to include the following auth block.
spec:
  auth:
    strategy: "openid"
    openid:
      client_id: "<your client id from GCP>"
      disable_rbac: true
      issuer_uri: "https://accounts.google.com"
      scopes: ["openid", "email"]
      username_claim: "email"
issuer_uri should be https://accounts.google.com.
Finally you will need to create a secret, if you don’t have one already, that sets the oidc-secret for the openid flow.
apiVersion: v1
kind: Secret
metadata:
  name: kiali
  namespace: istio-system
  labels:
    app: kiali
type: Opaque
data:
  oidc-secret: "<base64 encode your client secret from GCP and enter here>"
Once all these settings are complete just set your Kiali CR and the Kiali secret to your cluster. You may need to refresh your Kiali Pod to set the Secret if you add the Secret after the Kiali pod is created.
Using with Azure: AKS and AAD
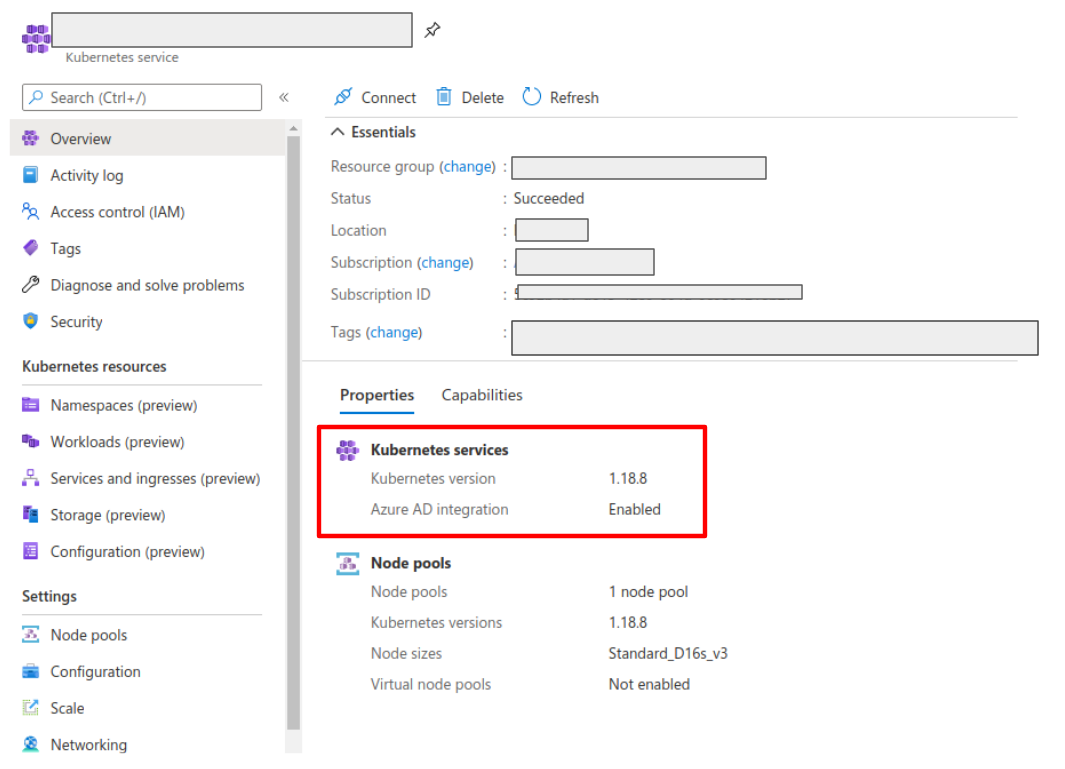
AKS has support for a feature named AKS-managed Azure Active Directory, which enables integration between AKS and AAD. This has the advantage that users can use their AAD credentials to access AKS clusters and can also use Kubernetes RBAC features to assign privileges to AAD users.
However, Azure is implementing this integration via the Kubernetes Webhook Token Authentication rather than via the Kubernetes OpenID Connect Tokens authentication (see the Azure AD integration section in AKS Concepts documentation). Because of this difference, authentication in AKS behaves slightly different from a standard OpenID setup, but Kiali’s OpenID authentication strategy can still be used with full RBAC support by following the next steps.
First, enable the AAD integration on your AKS cluster. See the official AKS documentation to learn how. Once it is enabled, your AKS panel should show the following:
Create a web application for Kiali in your Azure AD panel:
- Go to AAD > App Registration, create an application with a redirect url like
\https://<your-kiali-url> - Go to Certificates & secrets and create a client secret.
- After creating the client secret, take note of the provided secret. Create a
Kubernetes secret in your cluster as mentioned in the «setup-with-rbac,Set-up
with RBAC support» section. Please, note that the suggested name for the
Kubernetes Secret is
kiali. If you want to customize the secret name, you will have to specify your custom name in the Kiali CR. See the comments for thesecret_nameconfiguration in the sample Kiali CR.
- After creating the client secret, take note of the provided secret. Create a
Kubernetes secret in your cluster as mentioned in the «setup-with-rbac,Set-up
with RBAC support» section. Please, note that the suggested name for the
Kubernetes Secret is
- Go to API Permissions and press the Add a permission button. In the new page that appears, switch to the APIs my organization uses tab.
- Type the following ID in the search field:
6dae42f8-4368-4678-94ff-3960e28e3630(this is a shared ID for all Azure clusters). And select the resulting entry. - Select the Delegated permissions square.
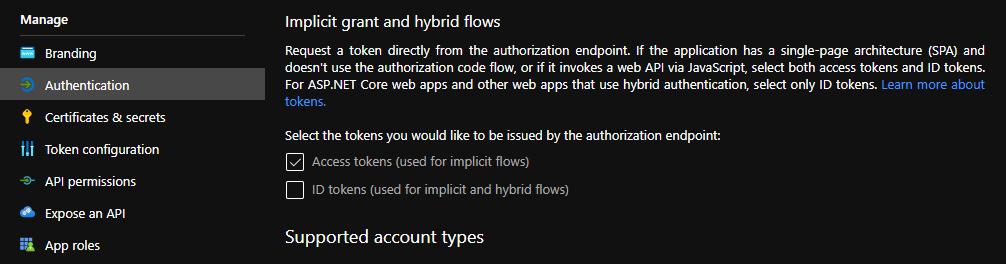
- Select the
user.readpermission. - Go to Authentication and make sure that the Access tokens checkbox is ticked.
Then, create or modify your Kiali CR and include the following settings:
spec:
  auth:
    strategy: "openid"
    openid:
      client_id: "<your Kiali application client id from Azure>"
      issuer_uri: "https://sts.windows.net/<your AAD tenant id>/"
      username_claim: preferred_username
      api_token: access_token
      additional_request_params:
        resource: "6dae42f8-4368-4678-94ff-3960e28e3630"
You can find your client_id and tenant_id in the Overview page of the Kiali
App registration that you just created. See this documentation for more information.
1.4 - OpenShift strategy
Introduction
The openshift authentication strategy is the preferred and default strategy
when Kiali is deployed on an OpenShift cluster.
When using the openshift strategy, a user logging into Kiali will be
redirected to the login page of the OpenShift console. Once the user provides
his OpenShift credentials, he will be redireted back to Kiali and will be
logged in if the user has enough privileges.
The openshift strategy takes advantage of the cluster’s RBAC. See the
Role-based access control documentation for more
details.
Set-up
Since openshift is the default strategy when deploying Kiali in OpenShift,
you shouldn’t need to configure anything. If you want to be verbose, use the
following configuration in the Kiali CR:
spec:
  auth:
    strategy: openshift
The openshift strategy doesn’t have any additional configuration. The Kiali
operator will make sure to setup the needed OpenShift OAuth resources to register
Kiali as a client.
1.5 - Token strategy
Introduction
The token authentication strategy allows a user to login to Kiali using the
token of a Kubernetes ServiceAccount. This is similar to the
login view of Kubernetes Dashboard.
The token strategy takes advantage of the cluster’s RBAC. See the Role-based access control documentation
for more details.
Set-up
Since token is the default strategy when deploying Kiali in Kubernetes, you
shouldn’t need to configure anything, unless your cluster is OpenShift. If you
want to be verbose or if you need to enable the token strategy in OpenShift,
use the following configuration in the Kiali CR:
spec:
  auth:
    strategy: token
The token strategy doesn’t have any additional configuration.
2 - Namespace Management
Introduction
The default Kiali installation (as mentioned in the Installation guide) gives Kiali access to all namespaces available in the cluster.
It is possible to restrict Kiali to a set of desired namespaces by providing a list of the ones you want, excluding the ones you don’t want, or filtering by a label selector. You can use a combination of these options.
Accessible Namespaces
You can configure which namespaces are accessible and observable through Kiali. You can use regex expressions which will be matched against the operator’s visible namespaces. If not set in the Kiali CR, the default makes accessible all cluster namespaces, with the exception of a predefined set of the cluster’s system workloads.
The list of accessible namespaces is specified in the Kiali CR via the
accessible_namespaces setting, under the main deployment section. As an
example, if Kiali is to be installed in the istio-system namespace, and is
expected to monitor all namespaces prefixed with mycorp_, the setting would
be:
spec:
  deployment:
    accessible_namespaces:
    - istio-system
    - mycorp_.*
This configuration accepts the special pattern accessible_namespaces: "**"
which denotes that Kiali is given access to all namespaces in the cluster.
accessible_namespaces: "**",
you must specify the --set clusterRoleCreator=true flag when invoking helm install.
When installing multiple Kiali instances into a single cluster,
accessible_namespaces must be mutually exclusive. In other words, a namespace
set must be matched by only one Kiali CR. Regular expressions must not have
overlapping patterns.
accessible_namespaces: "**".
Maistra supports multi-tenancy and the accessible_namespaces extends that
feature to Kiali. However, explicit naming of accessible namespaces can benefit
non-Maistra installations as well - with it Kiali does not need cluster roles
and the Kiali Operator does not need permissions to create cluster roles.
Excluded Namespaces
The Kiali CR tells the Kiali Operator which accessible namespaces should be excluded from the list of namespaces provided by the API and UI. This can be useful if wildcards are used when specifying link:#_accessible_namespaces[Accessible Namespaces]. This setting has no effect on namespace accessibility. It is only a filter, not security-related.
For example, if the accessible_namespaces configuration includes mycorp_.* but it is not desirable to see test namespaces, the following configuration can be used:
api:
  namespaces:
    exclude:
      - mycorp_test.*
Namespace Selectors
To fetch a subset of the available namespaces, Kiali supports an optional Kubernetes label selector. This selector is especially useful when spec.deployment.accessible_namespaces is set to ["+++**+++"] but you want to reduce the namespaces presented in the UI’s namespace list.
The label selector is defined in the Kiali CR setting spec.api.namespaces.label_selector.
The example below selects all namespaces that have a label kiali-enabled: true:
api:
  namespaces:
    label_selector: kiali-enabled=true
For further information on how this label_selector interacts with spec.deployment.accessible_namespaces read the technical documentation.
To label a namespace you can use the following command. For more information see the link:https://kubernetes.io/docs/concepts/overview/working-with-objects/labels[Kubernete’s official documentation].
kubectl label namespace my-namespace kiali-enabled=true
Note that when deploying multiple control planes in the same cluster, you will want to set the label selector’s value unique to each control plane. This allows each Kiali instance to select only the namespaces relevant to each control plane. Because in this “soft-multitenancy” mode spec.deployment.accessible_namespaces is typically set to an explicit set of namespaces (i.e. not ["+++**+++"]), you do not have to do anything with this label_selector. This is because the default value of label_selector is kiali.io/member-of: <spec.istio_namespace> when spec.deployment.accessible_namespaces is not set to the “all namespaces” value ["+++**+++"]. This allows you to have multiple control planes in the same cluster, with each control plane having its own Kiali instance. If you set your own Kiali instance name in the Kiali CR (i.e. you set spec.deployment.instance_name to something other than kiali), then the default label will be kiali.io/<spec.deployment.instance_name>.member-of: <spec.istio_namespace>.
3 - Role-based access control
Introduction
Kiali supports role-based access control (RBAC) when you are using either the
openid, openshift or token authentication strategies.
If you are using the anonymous strategy, RBAC isn’t supported, but you still
can limit privileges if your cluster is OpenShift. See the
access control section in Anonymous strategy .
Kiali uses the RBAC capabilities of the underlying cluster. Thus, RBAC is accomplished by using the standard RBAC features of the cluster, which is through ClusterRoles, ClusterRoleBindings, Roles and RoleBindings resources. Read the Kubernetes RBAC documentation for details. If you are using OpenShift, read the OpenShift RBAC documentation.
In general, Kiali will give access to the resources granted to the account used to login. Specifically, depending on the authentication strategy, this translates to:
| Authentication Strategy | Access To |
|---|---|
openid |
resources granted to the user of the third-party authentication system |
openshift |
resources granted to the OpenShift user |
token |
resources granted to the ServiceAccount whose token was used to login |
For example, if you are using the token strategy, you would grant
cluster-wide privileges to a ServiceAccount with this command:
$ kubectl create clusterrolebinding john-binding --clusterrole=kiali --serviceaccount=mynamespace:john
and if you are using openshift or openid strategies, you could assign
privileges with any of these commands:
$ kubectl create rolebinding john-openid-binding --clusterrole=kiali --user="john@example.com" --namespace=mynamespace
$ oc adm policy add-role-to-user kiali john -n mynamespace # For OpenShift clusters
Please read your cluster RBAC documentation to learn how to assign privileges.
Minimum required privileges to login
The get namespace privilege in some namespace is the minimum privilege needed
in order to be able to login to Kiali. This means you need the following
minimal Role bound to the user that wants to login:
apiVersion: rbac.authorization.k8s.io/v1
kind: Role
rules:
- apiGroups: [""]
  resources:
  - namespaces
  verbs:
  - get
This minimal Role will allow a user to login. Kiali may work partially, but
some pages may be blank or show erroneous information, and errors will be
logged constantly. You will need a broader set of privileges so that Kiali
works fine.
Privileges required for Kiali to work correctly
The default installation of Kiali creates a ClusterRole with the needed
privileges to take the most advantage of all Kiali features. Inspect the
privileges with
kubectl describe clusterrole kiali
view_only_mode: true
option, the ClusterRole will be named kiali-viewer instead of kiali.
Alternatively, check in the Kiali Operator source code. See either the Kubernetes role.yaml template file, or the OpenShift role.yaml template file.
You can use this ClusterRole to assign privileges to users requiring access
to Kiali. You can assign privileges either in one namespace, which will result in
users being able to see only resources in that namespace; or assign
cluster-wide privileges.
For example, to assign privileges to the john user and limiting access to the
myApp namespace, you could run either:
$ kubectl create rolebinding john-binding --clusterrole=kiali --user="john" --namespace=myApp
$ oc adm policy add-role-to-user kiali john -n myApp # For OpenShift clusters
But if you need to assign cluster-wide privileges, you could run either:
$ kubectl create clusterrolebinding john-admin-binding --clusterrole=kiali --user="john"
$ oc adm policy add-cluster-role-to-user kiali john # For OpenShift clusters
In case you need to assign a more limited set of privileges than the ones
present in the Kiali ClusterRole, create your own ClusterRole or Role
based off the privileges in Kiali’s ClusterRole and remove the privileges you
want to ban. You must understand that some Kiali features may not work properly
because of the reduced privilege set.
kiali or the kiali-viewer
ClusterRoles because they are bound to the Kiali ServiceAccount and editing
them may lead to Kiali not working properly.
4 - Virtual Machine workloads
Introduction
Kiali graph visualizes both Virtual Machine workloads (WorkloadEntry) and pod-based workloads, running inside a Kubernetes cluster. You must ensure that the Istio Proxy is running, and correctly configured, on the Virtual Machine. Also, Prometheus must be able to scrape the metrics endpoint of the Istio Proxy running on the VM. Kiali will then be able to read the traffic telemetry for the Virtual Machine workloads, and incorporate the VM workloads into the graph.
Configuring Prometheus to scrape VM-based Istio Proxy
Once the Istio Proxy is running on a Virtual Machine, configuring Prometheus to scrape the VM’s Istio Proxy metrics endpoint is the only configuration Kiali needs to display traffic for the VM-based workload. Configuring Prometheus will vary between environments. Here is a very simple example of a Prometheus configuration that includes a job to scrape VM based workloads:
- job_name: bookinfo-vms
  honor_timestamps: true
  scrape_interval: 15s
  scrape_timeout: 10s
  metrics_path: /stats/prometheus
  scheme: http
  follow_redirects: true
  static_configs:
  - targets:
    - details-v1:15020
    - productpage-v1:15020
    - ratings-v1:15020
    - reviews-v1:15020
    - reviews-v2:15020
    - reviews-v3:15020
5 - Custom Dashboards
Custom Dashboards require some configuration to work properly.
Declaring a custom dashboard
When installing Kiali, you define your own custom dashboards in the Kiali CR spec.custom_dashboards field. Here’s an example of what it looks like:
custom_dashboards:
- name: vertx-custom
  title: Vert.x Metrics
  runtime: Vert.x
  discoverOn: "vertx_http_server_connections"
  items:
  - chart:
      name: "Server response time"
      unit: "seconds"
      spans: 6
      metrics:
      - metricName: "vertx_http_server_responseTime_seconds"
        displayName: "Server response time"
      dataType: "histogram"
      aggregations:
      - label: "path"
        displayName: "Path"
      - label: "method"
        displayName: "Method"
  - chart:
      name: "Server active connections"
      unit: ""
      spans: 6
      metricName: "vertx_http_server_connections"
      dataType: "raw"
  - include: "micrometer-1.1-jvm"
  externalLinks:
  - name: "My custom Grafana dashboard"
    type: "grafana"
    variables:
      app: var-app
      namespace: var-namespace
      version: var-version
The name field corresponds to what you can set in the pod annotation kiali.io/dashboards.
The rest of the field definitions are:
- runtime: optional, name of the related runtime. It will be displayed on the corresponding Workload Details page. If omitted no name is displayed.
- title: dashboard title, displayed as a tab in Application or Workloads Details
- discoverOn: metric name to match for auto-discovery. If omitted, the dashboard won’t be discovered automatically, but can still be used via pods annotation.
- items: a list of items, that can be either chart, to define a new chart, or include to reference another dashboard
- chart: new chart object
- name: name of the chart
- chartType: type of the chart, can be one of line (default), area, bar or scatter
- unit: unit for Y-axis. Free-text field to provide any unit suffix. It can eventually be scaled on display. See specific section below.
- unitScale: in case the unit needs to be scaled by some factor, set that factor here. For instance, if your data is in milliseconds, set
0.001as scale andsecondsas unit. - spans: number of “spans” taken by the chart, from 1 to 12, using bootstrap convention
- metrics: a list of metrics to display on this single chart:
- metricName: the metric name in Prometheus
- displayName: name to display on chart
- dataType: type of data to be displayed in the chart. Can be one of raw, rate or histogram. Raw data will be queried without transformation. Rate data will be queried using promQL rate() function. And histogram with histogram_quantile() function.
- min and max: domain for Y-values. When unset, charts implementations should usually automatically adapt the domain with the displayed data.
- xAxis: type of the X-axis, can be one of time (default) or series. When set to series, only one datapoint per series will be displayed, and the chart type then defaults to bar.
- aggregator: defines how the time-series are aggregated when several are returned for a given metric and label set. For example, if a Deployment creates a ReplicaSet of several Pods, you will have at least one time-series per Pod. Since Kiali shows the dashboards at the workload (ReplicaSet) level or at the application level, they will have to be aggregated. This field can be used to fix the aggregator, with values such as sum or avg (full list available in Prometheus documentation). However, if omitted the aggregator will default to sum and can be changed from the dashboard UI.
- aggregations: list of labels eligible for aggregations / groupings (they will be displayed in Kiali through a dropdown list)
- label: Prometheus label name
- displayName: name to display in Kiali
- singleSelection: boolean flag to switch between single-selection and multi-selection modes on the values of this label. Defaults to false.
- groupLabels: a list of Prometheus labels to be used for grouping. Similar to aggregations, except this grouping will be always turned on.
- sortLabel: Prometheus label to be used for the metrics display order.
- sortLabelParseAs: set to int if sortLabel needs to be parsed and compared as an integer instead of string.
- include: to include another dashboard, or a specific chart from another dashboard. Typically used to compose with generic dashboards such as the ones about MicroProfile Metrics or Micrometer-based JVM metrics. To reference a full dashboard, set the name of that dashboard. To reference a specific chart of another dashboard, set the name of the dashboard followed by
$and the name of the chart (ex:include: "microprofile-1.1$Thread count").
- chart: new chart object
- externalLinks: a list of related external links (e.g. to Grafana dashboards)
- name: name of the related dashboard in the external system (e.g. name of a Grafana dashboard)
- type: link type, currently only grafana is allowed
- variables: a set of variables that can be injected in the URL. For instance, with something like namespace: var-namespace and app: var-app, an URL to a Grafana dashboard that manages namespace and app variables would look like:
http://grafana-server:3000/d/xyz/my-grafana-dashboard?var-namespace=some-namespace&var-app=some-app. The available variables in this context are namespace, app and version.
In Kiali, labels for grouping are aggregated in the top toolbar, so if the same label refers to different things depending on the metric, you wouldn’t be able to distinguish them in the UI. For that reason, ideally, labels should not have too generic names in Prometheus. For instance labels named “id” for both memory spaces and buffer pools would better be named “space_id” and “pool_id”. If you have control on label names, it’s an important aspect to take into consideration. Else, it is up to you to organize dashboards with that in mind, eventually splitting them into smaller ones to resolve clashes.
spec.custom_dashboards. Simply define a custom dashboard with the same name as the built-in dashboard. To remove a built-in dashboard so Kiali doesn’t use it, simply define a custom dashboard by defining only its name with no other data associated with it (e.g. in spec.custom_dashboards you add a list item that has - name: <name of built-in dashboard to remove>.
Dashboard scope
The custom dashboards defined in the Kiali CR are available for all workloads in all namespaces.
Additionally, new custom dashboards can be created for a given namespace or workload, using the dashboards.kiali.io/templates annotation.
This is an example where a “Custom Envoy” dashboard will be available for all applications and workloads for the default namespace:
apiVersion: v1
kind: Namespace
metadata:
  name: default
  annotations:
    dashboards.kiali.io/templates: |
      - name: custom_envoy
        title: Custom Envoy
        discoverOn: "envoy_server_uptime"
        items:
          - chart:
              name: "Pods uptime"
              spans: 12
              metricName: "envoy_server_uptime"
              dataType: "raw"
This other example will create an additional “Active Listeners” dashboard only on details-v1 workload:
apiVersion: apps/v1
kind: Deployment
metadata:
  name: details-v1
  labels:
    app: details
    version: v1
spec:
  replicas: 1
  selector:
    matchLabels:
      app: details
      version: v1
  template:
    metadata:
      labels:
        app: details
        version: v1
      annotations:
        dashboards.kiali.io/templates: |
          - name: envoy_listeners
            title: Active Listeners
            discoverOn: "envoy_listener_manager_total_listeners_active"
            items:
              - chart:
                  name: "Total Listeners"
                  spans: 12
                  metricName: "envoy_listener_manager_total_listeners_active"
                  dataType: "raw"
    spec:
      serviceAccountName: bookinfo-details
      containers:
      - name: details
        image: docker.io/istio/examples-bookinfo-details-v1:1.16.2
        imagePullPolicy: IfNotPresent
        ports:
        - containerPort: 9080
        securityContext:
          runAsUser: 1000
Units
Some units are recognized in Kiali and scaled appropriately when displayed on charts:
unit: "seconds"can be scaled down toms,µs, etc.unit: "bytes-si"andunit: "bitrate-si"can be scaled up tokB,MB(etc.) using SI / metric system. The aliasesunit: "bytes"andunit: "bitrate"can be used instead.unit: "bytes-iec"andunit: "bitrate-iec"can be scaled up toKiB,MiB(etc.) using IEC standard / IEEE 1541-2002 (scale by powers of 2).
Other units will fall into the default case and be scaled using SI standard. For instance, unit: "m" for meter can be scaled up to km.
Prometheus Configuration
Kiali custom dashboards work exclusively with Prometheus, so it must be configured correctly to pull your application metrics.
If you are using the demo Istio installation with addons, your Prometheus instance should already be correctly configured and you can skip to the next section; with the exception of Istio 1.6.x where
you need customize the ConfigMap, or install Istio with the flag --set meshConfig.enablePrometheusMerge=true.
Using another Prometheus instance
You can use a different instance of Prometheus for these metrics, as opposed to Istio metrics. This second Prometheus instance can be configured from the Kiali CR when using the Kiali operator, or ConfigMap otherwise:
# ...
external_services:
  custom_dashboards:
    prometheus:
      url: URL_TO_PROMETHEUS_SERVER_FOR_CUSTOM_DASHBOARDS
    namespace_label: kubernetes_namespace
  prometheus:
    url: URL_TO_PROMETHEUS_SERVER_FOR_ISTIO_METRICS
# ...
For more details on this configuration, such as Prometheus authentication options, check this page.
You must make sure that this Prometheus instance is correctly configured to scrape your application pods and generates labels that Kiali will understand. Please refer to
this documentation to setup the kubernetes_sd_config section. As a reference,
here is how it is configured in Istio.
It is important to preserve label mapping, so that Kiali can filter by app and version, and to have the same namespace label as defined per Kiali config. Here’s a relabel_configs that allows this:
      relabel_configs:
      - action: labelmap
        regex: __meta_kubernetes_pod_label_(.+)
      - source_labels: [__meta_kubernetes_namespace]
        action: replace
        target_label: kubernetes_namespace
Pod Annotations and Auto-discovery
Application pods must be annotated for the Prometheus scraper, for example, within a Deployment definition:
spec:
  template:
    metadata:
      annotations:
        prometheus.io/scrape: "true"
        prometheus.io/port: "8080"
        prometheus.io/path: "/metrics"
- prometheus.io/scrape tells Prometheus to fetch these metrics or not
- prometheus.io/port is the port under which metrics are exposed
- prometheus.io/path is the endpoint path where metrics are exposed, default is /metrics
Kiali will try to discover automatically dashboards that are relevant for a given Application or Workload. To do so, it reads their metrics and try to match them with the discoverOn field defined on dashboards.
But if you can’t rely on automatic discovery, you can explicitly annotate the pods to associate them with Kiali dashboards.
spec:
  template:
    metadata:
      annotations:
        # (prometheus annotations...)
        kiali.io/dashboards: vertx-server
kiali.io/dashboards is a comma-separated list of dashboard names that Kiali will look for. Each name in the list must match the name of a built-in dashboard or the name of a custom dashboard as defined in the Kial CR’s spec.custom_dashboards.
6 - Jaeger / Distributed Tracing
Below are some commonly used configuration options for Kiali’s Jaeger integration for Tracing.
For advanced tracing integration, you can also refer to the Kiali CR external_services.tracing section. For Helm installations, it is valid for the config map as well.
In-Cluster URL
In order to fully integrate with Jaeger, Kiali needs a URL that can be resolved from inside the cluster, typically using Kubernetes DNS. This is the in_cluster_url configuration. For instance, for a Jaeger service named tracing, within istio-system namespace, Kiali config would be:
  external_services:
    tracing:
      in_cluster_url: 'http://tracing.istio-system/jaeger'
in_cluster_url so you wouldn’t have to change anything. If you don’t use the Kiali operator, this config can be set in Kiali config map.
External URL
When not using an In-Cluster configuration, Kiali can be configuring with an external URL. This can be useful, for example, if Jaeger is not accessible from the Kiali pod. Doing so will enable links from Kiali to the Jaeger UI. This URL needs to be accessible from the browser (it’s used for links generation). Example:
  external_services:
    tracing:
      in_cluster_url: 'http://tracing.istio-system/jaeger'
      url: 'http://my-jaeger-host/jaeger'
url and not in_cluster_url, Kiali will not be able to show its native tracing charts, but instead will display external links to the Jaeger UI.
Once this URL is set, Kiali will show an additional item to the main menu: